Entries in Quilting (64)

Tuesday
Dec272011

Farmer's Wife Quilt Along Week 31

Hello hello!  Hope you had a lovely Christmas.  I've had an amazing few days, but more about that later this week ... or next.

Today I have new FW blocks for you in colors I'm calling "The Kitchen Sink" palette. :)

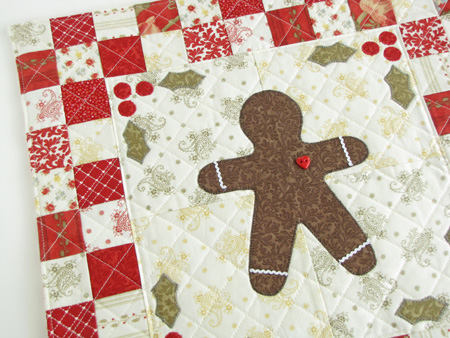
I've been DYING to make this block - Postage Stamp - since I started this QAL back in June.  This sort of piecing is really one of my all time favorite activities. 

I was going to wait a while longer to make it, for no particular reason, I guess. 

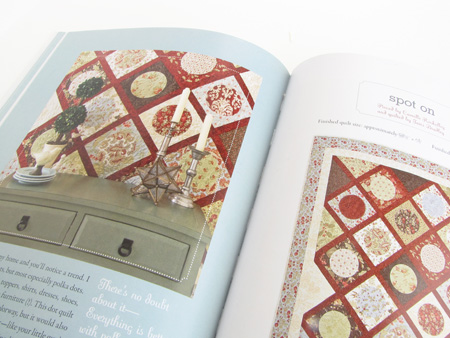
But suddenly I was inspired by a few things ... this image I found at one of my new favorite blogs (well, new to me - she's been around for quite a while!)  Something about the pretty, colorful ornaments on this tree ... I actually get butterflies in my tummy when I look at this photo.  I can't explain it.

And the thought of what Christmas usually looks like - an explosion of color with all the gifts, wrapping paper, decorations, lights, candy ... especially if kids are involved.

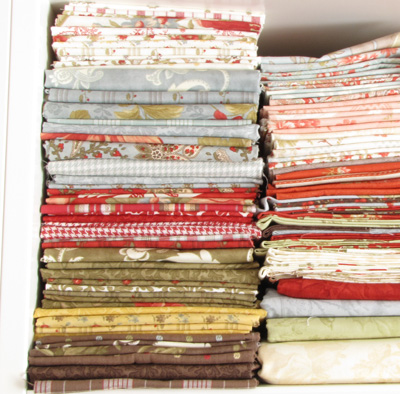
So I decided to cut one square from every print I'm using for my FWQAL quilt and found that I had almost enough squares for 2 blocks!

I just threw in a few more whites and voila! 

I have a feeling that when it comes to the final quilt there'll be a few blocks that won't play nicely with the others and won't be allowed to join in.  But I'm sure both these blocks will make the final cut because ...

I ... LOVE ... THEM ... SO ... MUCH!!!  It's sad really ... how much I love them.

So much so that right now I'm totally wanting to make a huge quilt with just these little 3/4" squares. 

Don't think I won't!  In fact, I just might do that with all my scraps at the end of this QAL. 

One of these days I'll show you the quilt I made that ended up with literally thousands of tiny pieces.

You think I'm joking, don't you? 

Dude.  I don't joke about things like that ...

Monday
Dec192011

Farmer's Wife Quilt Along Week 30

Wait for it ...


Red, White & GREEN! 

Last time ... promise.  ;)

#65 - Peaceful Hours

With a name like that I prob'ly shoulda made this block with blues and/or grays.  But I just kept seeing a wreath so I went with it.

And how perfect is that fussy cut design in the middle?  Doing the happy dance over that one!

#86 - Squash Blossom

I was seriously tempted to use orange fabric for this block.  You know me and my tendency to interpret things literally.  I kept thinking zucchini. 

But since there is no orange in the Flower Sugar fabric lines, I settled for red.

Hmmm ... maybe I shoulda gone with yellow instead.  But at this point I really can't be bothered to remake this block so red it shall stay.

Does anyone happen to know if there is such a thing as a squash with a red blossom?  I might sleep better at night knowing one really does exist.

Friday
Sep302011

Repentant Quilter

Forgive me Father for I have sinned. 

I've never participated in a Block of the Month Club.  Ever.  In 25 years of quilting.  Can you believe that?

I've watched many a BOM Club project unfold - from a safe distance.  Some even start out promising.  Really promising.  But just when I think I'll jump onboard, a super ugly block and/or fabric shows up and I turn and run for the hills, thanking my lucky stars that I escaped unharmed.  I chalk it up to an (un)healthy dose of "perfectionism" (or control-freak-ism ... whichever you prefer.  I'll admit to both). 

I started one once - about 15 years ago.  The first block had a white background.  But then the next one had a cream background.  Couldn't do it.  So I quit.

If I'm gonna spend that much time on a quilt, I want to like it when it's done.  I don't want to make (yet another) quilt I can't stand and then end up giving it to my brother who lives in a cabin in the woods ... where no one who knows me will see it.  Ever.  Because it's so ugly. 

(No, he's not the unabomber.  He owns a ski lodge/touring company for extreme skiiers.  And his "cabin" is a pretty nice lodge ... )

See, I've long referred to myself as a "Line Whore" - meaning I'm most comfortable making quilts with fabrics that are all from the same designer/collection.

I know, I know.  Some quilters think that's a lazy/boring way to sew.  I understand.  And I deeply respect those who can throw fabrics from here and there and everywhere into a quilt and have it be the most stunning thing EVER.  I envy that skill.  But I can't help it.  I've just made too many costly mistakes and I'm very gun shy about experimenting.

Told ya ... perfectionism at its worst.  :(

Well, I finally found a BOM - "Mystery" no less - that I'm excited to do.  It uses a TO-DIE-FOR fabric line ...

I mean, come ON.  HOW can you NOT love Strawberry Fields by Fig Tree

And with blocks designed by super awesomely nice & talented ladies like these?

Can't go wrong. :)

This Club started in June but I'm a little behind because I entered my address wrong when I signed up online (graying hair strikes again!) with the Fat Quarter Shop and ... long story short, I got my first block & finishing kit 3 months late. 

TOTALLY MY FAULT! 

And the ladies at Fat Quarter Shop were so nice about it too.  (Thank you, Cheryl!)  :)

The best thing about this BOM for me?  I joined with a friend of mine.  We got together a few days ago to play catch up.  She was nice and waited for my stuff to arrive in the mail. 

I have good friends. ;)

Oh, and the OTHER best thing about this project?  We split a fat quarter bundle ... in case we screw up. 

Any excuse to buy more fabric, right?!  (Although it's possible I threatened her into the joint purchase). 

But I'm finding that the fabric provided in the monthly kits seem to be VERY generous so we probably didn't really NEED the extra fabric.  (Since when did I ever worry about NEED?) tee hee

Block #1 - by Bonnie of Cotton Way & Camille of Thimbleblossoms

Block #2 by Pam of Heartspun Quilts

Block #3 by Carrie of Miss Rosie's Quilt Co.

These blocks were fun to make ... but at 12" they are positively GINORMOUS next to all my little 4.5" FWQAL blocks!

Tuesday
Aug302011

Back to School Messenger Bag

Here it is ... the messenger bag.

Happily I didn't have to resort to implicating an imaginary dog ...  ;). 

What do you think?

My daughter loves it.  I'm sorta impressed with it myself.

One fabric change and few additions were required since my last post. 

First, I talked her into going with the polka dot instead of the red tonal - I thought the dots would look just a bit softer.  Plus, dots are happy ... and little sister's backpack has them.  I like doing things like that. 

I needed more fabrics because the pocket on the back was an afterthought and I made the flap bigger than originally planned (better too big than too small) so we added the pretty scallop and flowers to the mix. 

She resisted the flowers a bit because she was trying so hard to achieve her idea of grown-up, but it was the last gray print in the bundle and she reeeeeeeally wanted to stick with the one color.  She's quite happy with it on the inside. ;)

And I forgot to show you the fabrics she chose for the inside lining ...

Aqua!

When I started making all the different components of the bag, I asked her how she wanted me to top-stitch each piece.  She asked what her choices were. 

"Well, my dear child.  That is an EXCELLENT question.  Let me show you what your mama can do NOW!"

One problem:  we both became crippled with indecision.  Who knew an FMQ repertoire could cause a problem?  haha

So, she went with a few different ones ...

Front

Back (with a little heart in the top right corner ... because I love her.)

A small monogram for the flap embellishment was all she wanted with the FMQ flowers.  And for the first time ever I tried my hand a raw-edge applique.  Turned out great!  Thank you Miss Amy for the inspiration ;)

I added a large pocket to the back and a handle for hanging on a hook.

I installed an easy-to-use zipper on the inside ... TWICE.  (Yep ... I knew y'all were waiting for my screw-up confessional.)  The first time it went in upside down.  It was late and I was tired so I didn't take a picture of it.  But here's the evidence. 

Second time ...

She INSISTED on a red zipper ... to go with all the little red accents on the bag.  She's so cute. 

I used two different fabrics for the zipper to "make do".  They are the leftovers from the front and back panels.  A little scrappy ... but not TOO scrappy.

And check out the shoulder pad!  Thanks for the suggestion, Kate. 

I made the entire bag with 10 fat quarters - no yardage - and only scraps for leftovers ...

Check back tomorrow to see what I did with them.

Friday
Aug262011

Back To School Prep

Five years ago when my oldest daughter started Kindergarten, I made her a backpack for school.  (Sorry, no picture ... it was salvaged for parts a few years ago.)  It was the prettiest backpack ever.  I vowed to myself that my girls were going to have brand new handmade backpacks every September for the rest of their lives. ;) 

So far, I've kept that promise.  But I'm about to break it.

I had a weird moment of weakness this summer when we were shopping for school clothes and I saw this ...

I thought it was perfect for my little one! 

I dunno.  Something about the pink & happy polka dots.  And the navy.  I couldn't even believe the words coming out of my mouth as I asked her if she'd like it for school.  She said yes.  I wasn't sure how I felt about that.

So right now I'm sorta sad that I broke my informal promise to make two new backpacks every year (until they flat out refuse to take ANYTHING homemade to school because "that is SO NOT COOL ... no one ELSE does, MOM!")  (Ouch! Stick a knife in my heart already!)  But I'm also sorta relieved that I only have to make one this year.

So.  My Grade 5er decided she needs something more sophisticated this year ... because she's not a little kid anymore - she's TEN.  So she's requested a messenger bag. 

Ok.  I can do that.

I also gave her freedom to pick anything (well, ALMOST anything) from my stash.  She went straight for these ...

The grays from Bonnie & Camille's new "Ruby" line.  She thinks this is a very grown up color.  I agree.

(I know!  She isn't a pink girl like her mom.  I'm slowly coming to terms with that ... although sometimes I wonder if she was accidentally switched in the hospital.)

I don't have any yardage - just these FQs.  So it will look sorta patchy.  But not TOO patchy (so I've been directed).

She also wants just a little bit of decoration on the flap.  We're thinking about either applique or embroidery in red.  Perhaps a monogram.  Or a heart.  Or flowers.  Or a combination.  Or something else we haven't thought of yet.  I'm workin' without a net here ... or a pattern. 

I've actually never made a messenger bag before.  This is my rough sketch which has been approved by my client.

I can hardly wait to get sewing.  I hope it turns out!  I'll show it to you when it's done ... if it looks good.  If not, then I'll lie and tell you the dog ate it. 

'Cept we don't have a dog ...

Tuesday
Jul052011

Project Simplify - Day 38

Oooh, I'm very excited about this palette.

See?

I know.  It's a head-scratcher to me as well why I love these muddy, earthy, nature-inspired Japanese prints.  They're such a departure from my shabby chic, girly, pink, soft, pastel esthetic.  But I do love 'em.

I have a funny story for you about one of these fabrics.

I made Happy Hauntings by the lovely Verna Mosquera a few years ago in a lovely selection of Japanese fabrics.  This print was used for the skeleton:

Ever since then, I can't look at this print without thinking of bone marrow. 

I mean, come ON!  Doesn't this look like the holes in the middle of a bone?!

I've tried to use this fabric in a few projects, but I just keep seeing bone!  Has that ever happened to you - somehow getting a weird association with a print and then you can't NOT think about it?

But for this quilt, the little corner pieces are so small that the "marrow effect" won't be seen ... I hope! ;)

Thursday
Jun302011

Project Simplify - Day 37

Happy-Go-Lucky is the name of this Chapter's quilt.  Camille writes that the name was inspired by her mood when she was making it.  Wonder if it will have the same effect on me. :)

Remember this "bruise" experiment from one of my Quilt Market bags?

Well, it inspired the fabric selection for this quilt (and the last pillow).

Even though I didn't like how they worked in the bag design, they were awesome in the pillow and I think they'll work great for this quilt.  I just need to add a really light print for the little corners, pull out the lightest ones because they'll blend too much with the light corners and choose one really dark print for the inner border.

These fabrics hit my radar about six years ago when the quilt shop where I worked got their first shipment of Lecien fabrics.  They were very different from anything else at the time.  Many of these very fabrics are from that first batch and I've been hoarding them ... waiting.  I've made several quilts for the shop with these fabrics, but nothing really for myself.

Thursday
Jun232011

Project Simplify - Day 36

The last pillow for the week is called Happy-Go-Lucky and is based on the quilt from the next chapter. 

I was ready to tackle a new FMQ (free-motion quilting) design and thought what better way to practice than on a little pillow?

So. 

When I bought this book and became inspired to learm FMQing, one of the designs Camille mentions is called "Stones" (also known as Pebbles - I think the size determines the name) and she used it here.

Now, you may be surprised to learn this about me, but I tend to be quick to judge.  Sometimes a little too quick.  (That disturbance in the force you just felt was the collective eye-rolling & head-nodding by everyone who knows me well.)  I'm notorious for dismissing new things at first glance.  What can I say?  I'm a work in progress. ;)

See, I've seen Stones before and it doesn't really ring my bell.  I mean, it's rocks - not to be confused with "it rocks".  Rocks are rugged, hard, dirty and ... well ... they're just not what I would call pretty.  (Diamonds don't count, by the way.)  I remember thinking that in my mission to learn FMQing, I was NEVER doing Stones. 

Now, feeling a little sheepish, I confess that for some reason unbeknownst to me, I got the urge to try it.  Go figure.

So.

Camille suggests starting out by practicing with pen & paper.  Kay. 

Fine.  Easy.  (Boring.)

I was always the student in class who would listen to the very beginning instructions and then miss everything else - usually important stuff - because I was so anxious to get going already!  (Then I'd get in trouble ... )

Next?

Practice with real fabric.  Oh goodie!

Attempt #1:

(Insert hysterical laughter here.  No, seriously, go ahead!  I let any pride fall away from me since the last time I tried a new FMQ technique.  I am now officially immune to abject humiliation.)

Clearly, I lost something from the pen to the needle.  Hmmm.  Let's look online for a video, shall we?

Ok.  Got it.  Avoid thread play (go over previous stitches EXACTLY). 

Attempt #2:

Hmmm.  Not much better. 

Let's watch the video, like, 20 more times...

Dude!  What happened?  Something just seems to have clicked here!  (Again, the trick for me is to SLOW DOWN.)

I'm telling you, making these Stones kinda freaks me out.  It's weird how it looks so ... organic ... and it just sorta ... happens.  Bizzare.  And yet very, very cool, I have to admit.

So here's the pillow.

Totally awesome, right?!

It did take quite a while to FMQ - almost 2 hours - an eternity compared to loops or a grid.  The lady in the video wasn't kidding when she said this design is best for SMALL areas. 

I guess rocks do rock after all!

Wednesday
Jun222011

Project Simplify - Day 35

Today's pillow is called Dream Big. 

So.

When I was trying to decide on fabric for this pillow, it suddenly occurred to me - what would Project Simplify be without some Bonnie & Camille fabric?  Oh how I love that feeling when inspiration hits.  Sometimes it really does feel like lightning!

In fact, Lady Camille herself gave me this fabric at Market.  (My cup really does runneth over ...)

So.

I adore making checkerboards.  And when I'm making something - either from a pattern or working freestyle - I always seem to look at fabrics as darks & lights.  Because this little baby charm pack didn't have enough squares for the pillow requirements, I thought I'd supplement with white. 

Ah, white.  I love white.  I really do.  I'd say 95% of the quilts I've ever made for myself have white in them.  (And the ones that didn't have white have all been given away!)  My kitchen is white, my bathroom is white, all the wood trim in my house is painted white, all my sheets & towels are white ... (I think you get the picture).

So here's "Little Ruby" ... on a white chair ...  ;)

By the way, if you didn't know, this line of fabric was named after Camille's grandmother.  Isn't that just the sweetest homage ever?  Telling me something like that when I have PMS can make me cry ... just sayin'.

I struggled a bit on the fabric for the inner border.  At first I wanted a nice vivid red.  But the truth is  A)  I would have had to butcher a FQ from my big Ruby bundle and  B)  I was already somewhat traumatized from using up my cutie little baby charm pack  (sniff ...)

Sorry, but I just wasn't emotionally ready for that.  ;) 

So white it is.  I honestly do like how it makes the checkerboard float.

I copied the top-stitching design idea from the book.  Super easy.  I think I like it because it's sort of a modern take on my (yawn) cross-hatch.

Have I become, like, so totally annoying with my cross-hatch this and cross-hatch that?  Sorry.  I guess I'm just so surprised at how limiting my "repertoire" was until I took on my FMQ challenge.

I mean, don't get me wrong.  I ADORE cross-hatching.  I really really do.  But because it was the ONLY thing I ever did, now that I'm trying out new things and learning FMQing, I feel a lovely sense of freedom, and ... choice.  That's it.  I have more options now.

Oh, and one more thing - you might want to check back here with me on Friday ... ;)

Tuesday
Jun212011

Project Simplify - Day 34

Pillow #2 is based on the "Coming Home" Quilt.

I had a few charm squares left over from the quilt and thought a pillow would make a nice compliment to the table topper (my helper has informed me she's keeping it ...)

I chickened out on the top-stitching (again) and did the 'ole cross-hatch.  But I regret it now.  Because the quilt & pillow don't have the same finish, they don't quite look like a set to me.

Oh well, they're so easy to make I'll do another one - properly, this time. :)

And I did my sneaky pieced back again.  It works like ... a charm! 

(Sorry, couldn't resist.)

Monday
Jun202011

Project Simplify - Day 33

Dear Readers,

This post originally contained the word "schwack".  Now, I grew up with the word meaning "lots and lots" and have used it often - with that definition - since I was a little girl.  But it was just brought to my attention that this word in the Urban Dictionary means something VERY different ... and offensive.  My deepest apologies if you thought I was being rude or disrepectful in any way.

Sincerely, K

          *          *          *          *          *          *          *          *

Welcome to Pillow Week everybody!

I'm very excited  - 4 quick, easy & fun projects in one week so let's get started.

The first pillow is a derivative of the last quilt I made - "Spot On".

Now, I COULD have made this pillow with the same fabrics as the quilt, but I just so happened to have a HUGE pile of "Simplicity" (a line by 3 Sisters for Moda) charm squares that I knew would be perfect for this pillow and I'm ready to use up some of these squares I've been hoarding for - what - three years?  Four years?  Too long.

I fussy cut the middle circle - it says "Family". 

And I really liked doing the swirly twirly FMQ on this pillow.  (Yay me!)

I strayed from the instructions a little here so I could use up even more charm squares by piecing them together to make the pillow back. 

Notice how I matched the squares that overlap?  (S.M.R.T.  that's me!)

Hmmm, what else can I make with these pretty squares? 

Told ya I had a huge pile!

Friday
Jun172011

Project Simplify - Day 32

Okay.  It's official.  "Moonlight" is a keeper. 

Blue is his favorite color and there are soooo many pink & girly quilts in this house.  The guy deserves one that ... well ... he likes for reasons OTHER than because his wife made it.

So much for going traditional with this quilt ... despite using prints like a fine houndstooth, classic acanthus leaf, delicate florals and a sweet plaid, this quilt looks really modern to me. 

About the name - my helper & I talked about where you can draw inspiration from when choosing a name.  We focused on the colors & shapes.  I suggested "Arctic Circles", but she's only in Grade 2 and informed me that, "I haven't learned anything about that in school yet, Mummy."  Her sister suggested "Dancing Circles", but again the assistant explained to us - with all possible conviction of an 8 year old - that didn't make any sense AT ALL because the straight lines in the quilt would not allow any dancing to go on.  (I love hearing their thought processes .. kids are so funny!)

So "Moonlight" it is.

I had quite a bit more back-piecing to do for this one than the previous two Project Simplify quilts.  I just used up a bunch of fabric pieces that came in the "Glace" kit.  (Yay!)

Next week ... pillows!

Thursday
Jun162011

Project Simplify - Day 31

I made a few last minute fabric changes with this quilt. 

First, I had to banish the paisley print.  This post I wrote a while back will explain why. 

See? 

Too bossy.

Second, I planned to use this pretty print for the border. 

I thought it would frame the quilt nicely.  But when I got to the border part, I found it too overpowering. 

The cream just looked waaay better.

Ya know, this is one of the things I love about quilting.  You start off thinking you're in charge, but somewhere along the way the quilt takes over and starts telling YOU what it wants to look like.  Then you have a choice: either obey the quilt and do what IT wants you to do, OR be stubborn, ignore it and then have it hate you for the rest of it's life (and you it). 

I have chosen wisely ...

Wednesday
Jun152011

Project Simplify - Day 30

Geez, I had a string of bad luck with this quilt!  (All me, NOT the book!)

First, my border piece was short by about 2 inches.   (Because I'm using yardage that may have been previously cut, sometimes I have to wing it.)

Then this ... my bobbins ran out with, what, 3 feet to go?

And this ... my binding was short by, what, an inch?

And then this!  What are the odds of a binding seam landing exactly on a corner? 

No, seriously.  Anyone know how to calculate odds?  Six seams, 4 corners, 280”  ...  I really want to know!

As you've probably noticed by now, I retreated to the safety of my boring cross-hatch topstitching for this quilt.  I know, I know.  But I really like how it compliments the diagonal sashing and contrasts with the circles.  Ok, plus I needed to soothe my ego a little after the last chapter. ;)  I promise to get back in the saddle for the next quilt.

I went with blue thread because I like how it gently pops on the cream background.  My other choice was cream thread, but then I'd have these weird lines - only in one direction - on the sashing. 

And red thread would have been too Amityville Horror for me.  (I read the book when I was about 13 ... I'm still traumatized!)

Monday
Jun132011

Project Simplify - Day 29

(Sigh.)  Time for a cup of tea ...

This happens to me once in a while when my hand accidentally moves the stitch selection wheel on my machine as I'm shoving a large quilt through.

I think there's a way I can lock the machine from doing this, but that would A) require me to remember how to do it or B) dig out my manual  ...

Me pick PINK! ;)

Friday
Jun102011

Project Simplify - Day 28

I'm a cheater.  And I'm not afraid to admit it.

Yes, sometimes I look for the easy way out and bend the rules a bit.  In this case, I'm talking about the circle template for Spot On.  It requires enlarging.  I don't mind.  I'm lucky to have a printer/fax/copier thingy here at home. 

But I was thinking more about my little helper and making tracing easy for her.  So instead of making a template as per the pattern, I rooted around my kitchen for something round.  The best I could do was a plate that's about 1/4" smaller than the actual template.

It was so easy for her to use.  (Yes, that's a Laura Ashley saucer!)

I don't think the quilting police will come and arrest me because the circles are a smidgen smaller than the pattern said.  

But in case they do - and you'd like to make my prison stay more comfortable - I like Ghirardelli brownies (with chopped walnut, if you don't mind), Irish Breakfast tea and Japanese craft books & magazines

Thanks in advance.

Wednesday
Jun082011

Project Simplify - Day 27

Well, after MUCH fabric play & yardage consideration (I kept running into the "crap, I don't have enough of that fabric" problem) I surprised myself by going with this two-color grouping which is mostly Roman Holiday, and the blue and cream tonals from Glace - another 3 Sisters Christmas line (the same line Camille used for this quilt in the book) that came in a kit I've had for a while.

I mean, I love two-tone quilts and I really love this smokey blue-gray & cream combo (with little hits of red!).  But for some reason I was trying really hard to use the entire Roman Holiday line. 

For years I'd walk into a store, see a quilt and want those.exact.fabrics to make it for myself.  I had trouble imagining quilts in different colors.  I know lots of other quilters struggle with the same issue.  Let's face it, fabric ain't cheap and making quilts - especially big ones - is an investment in both time & money.  And believe me, I've made my fair share of costly "experimenting with fabric" mistakes.

I'm still not the world's best fabric picker for quilts.  I really admire people who can walk through a quilt store, "cherry pick" bolts from all over the place and put together a fabulous fabric collection for a quilt. More often than not, I rely on a fabric line when I make a quilt.  But time and experience has made me a little more comfortable & confident with my personal fabric likes & dislikes.

Plus - just a personal goal - I'd like most of the quilts I make for Project Simplify to look at least a little - and preferably a lot - different from the ones in the book, if only for those of you who are still learning to visualize quilts in different fabrics.  Maybe you'll be inspired to give future quilt designs a second look if they're made up in colors & prints that don't appeal to you.  You just might find an unexpected treasure!

Monday
Jun062011

Project Simplify - Day 26

Chapter Five - The halfway mark!

I really like this quilt - Spot On. 

Remember Donnie & Marie Osmond's hit "A Little Bit Country, A Little Bit Rock & Roll?"  This quilt - to me - is a little bit traditional, a little bit modern.  The large graphic circles strike me as contemporary, but the sashing & on-point set of the blocks reads traditional.  I think you could tip the balance either way with the fabric selection.

I'm going traditional with this fabric collection from a few years ago by 3 Sisters for Moda called Roman Holiday.  I'm a sucker for a good Christmas fabric line and 3 Sisters - more often than not - has me at "Hello". ;)

I made this quilt by Bunny Hill a few years ago for the shop and most of the fabric was from this collection.  It was so pretty I had to buy the FQ bundle (plus yardage, of course) for myself.

I also made this little wall hanging (my own design) a few years ago.  I hang it over my kitchen sink at Christmas time.  Kinda cute, no?

Hmmm, what a surprise ... it's cross-hatched.

Thursday
May262011

Project Simplify - Day 23

Sometimes I can think outside the box and come up with good ideas on my own.  But for now, I still need a crutch for deciding on a FMQing design.  So why not copy (again) what is shown in the book?

Camille's used three different FMQ designs on this cute little quilt:  stippling, that loop-dee-loop from "Little Man" and a sort of scalloped flower thing.  At first glance, I thought that was a bit ambitious for me to attempt, but it is a small quilt and if I want to improve my skills, I might as well go for it.  (You know, broadening ones horizons and all ...)

Here's my practice run.  Not bad, eh? 

The results:  not perfect - still a little jerky here and there.

And a little accidental loop ...

Is it just me, or is it easier to get out of a tight spot with swirly twirly?  Stippling just seems a bit less forgiving.

And then there's my old nemesis - tension.  Hmmph.

One of these days I'll remember that if you practice your FMQ stitching with fabric/batting/thread that's not exactly the same as your quilt, you must double check your tension when you start sewing on the actual quilt!  At least this stuff was easy to pull out.  I gave the fun to you-know-who ... little Miss Loves-A-Ripper.

I'll show you the embarrassing part next time.  That's right, dear friends, I'm not through humiliating myself for your entertainment!

Monday
May232011

Project Simplify - Day 21

Chapter Four is a sweet little table topper called Coming Home.

At Quilt Market in Houston last fall I met Robyn Pandolph and got a charm pack of her new line "Scarborough Fair". 

I love it. 

I also bought the FQ bundle. 

I know, you're shocked ... ;)

Except for a few squares that I used in Last Chapter's quilt I haven't made anything with this fabric yet and I'm excited that I finally get to play with it.

Since the taupe/cream background fabric I'd planned for the last quilt didn't turn out, I'm going to give it another try for this quilt. 

And FOR SURE this time I'm going to use pink for the border.

Promise! :)