« saturday morning sewing | Main | tilda's fairytale wonderland »
Tuesday
Apr012014

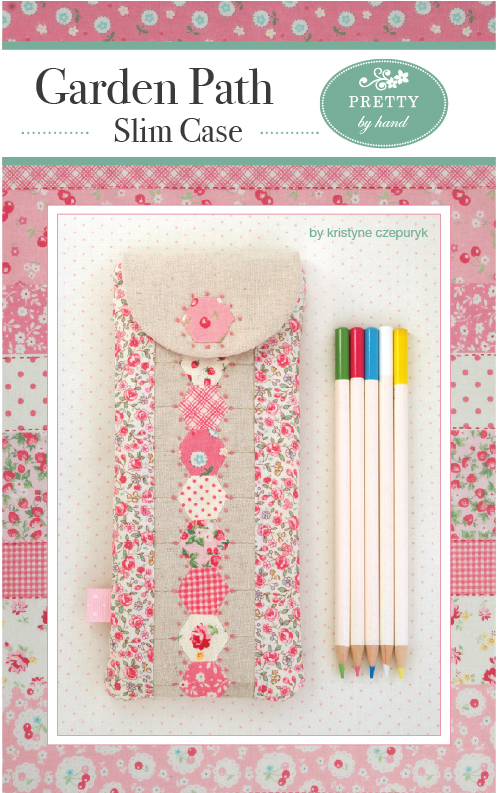
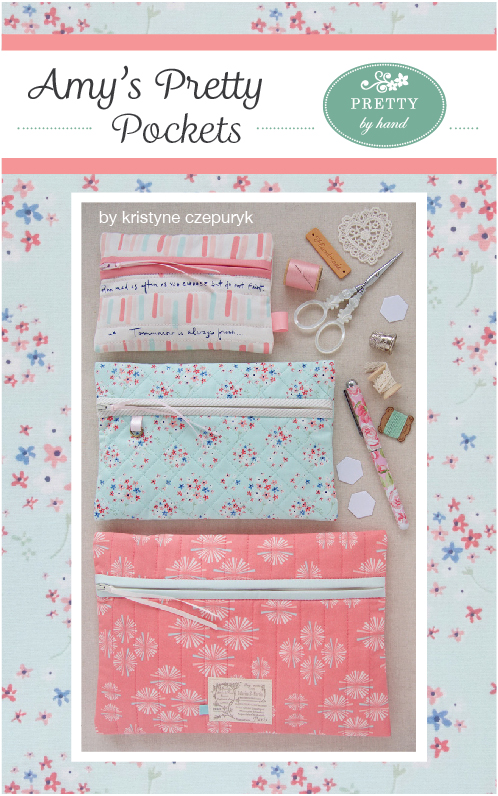
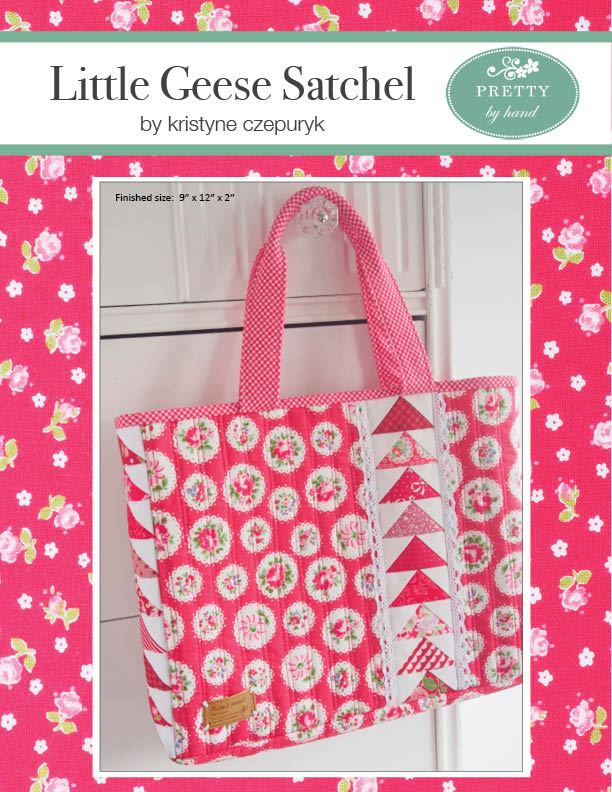
cotton tape label tutorial

I've been collecting these natural cotton tapes and leather labels from places like Etsy and my local quilt shop for a while now - ever since Miss Amy clued me in.  Can't seem to get enough of them.  They add such a nice, professional finish and a pretty little detail to just about any sewing project.

Here's how I like to use them.

First, just plain. 

  1. Cut the label.
  2. Fold and press the cut edges under.
  3. Apply a piece of fusible web to the back side of the label.
  4. Iron it in place onto your project.
  5. Sew around the edges with a straight or zigzag stitch.

Easy peasy.

To get a little fancier, I put a contrasting fabric underneath.  It frames the label and draws your eye right right to it.  I use the same fusible web process for both layers.


I also like using felt underneath instead of fabric.  And I like using my scalloped scissors (found them on eBay) for felt, although pinking shears or a straight edge look very nice.  (Again, same fusible web trick.)

Then there's this really cool stuff called Kraft-Tex.  Check your local quilt/craft shop or search online.  It comes in rolls in a few different colours (white, black, craft-paper brown ...).  It feels like a stiff paper but you can wash it - as in put it in the washing machine AND the dryer - iron it, cut it, fold it, paint it, stamp it, machine and hand stitch it ...  .  I use it to back/frame labels too. 

Take it a step further and fuse fabric to Kraft-Tex before trimming to keep the fabric from fraying.

And finally there are these leather labels.  I hand stitch them on with embroidery thread. 

So that's that.  Not much to it, really.  They take mere minutes to make.  And they're fun. :)

I found most of my cotton tapes and the leather labels here and here.

I've added this tutorial to my Tutorials link at the top of the page so you can find this post easily whenever you like. 

*     *     *     *     *

Congratulations to Dara, winner of the American Jane jelly roll from Green Fairy Quilts!  Thank you all for playing along.

EmailEmail Article to Friend

Reader Comments (27)

Wow! So simple to do but sooo effective! Thanks so much for the tutorial.
April 1, 2014 | Unregistered CommenterMichelle
Really lovely--such a nice added touch! Thanks for sharing!
April 1, 2014 | Unregistered CommenterWendy
Brilliant information. Thank you for all you share.
April 1, 2014 | Unregistered CommenterMelody
These tapes and labels are delightful and you have shared some very pretty ways of using them. I can't find any leather labels on either site mentioned....
Oh my! Just stunning!
April 1, 2014 | Unregistered CommenterSusie
These are wonderful, they add an extra dimension to a project and give it a modern vintage quality I think. Thank you for sharing! I have been admiring your work and wondered how you did it. I am also amazed to hear about the scalloped sears- will have to look for them, the scalloped edge labels look brilliant
April 2, 2014 | Unregistered Commentereva rose
Thank you so much for the tutorial, I was given some lovely tape printed with scissors, pins and buttons but was at a loss what to do with it. Now I know, yipee
Sharon x
April 2, 2014 | Unregistered Commentersharon gibson
Thanks for the lesson! I was wondering how to apply these labels?)))
Really liked all the options! I noticed that option with the felt/
April 2, 2014 | Unregistered CommenterНаталья
Maybe I missed a previous post about stamping the lettering/pictures onto the tape…….how do you do that? I'm sure there must be some special ink involved. Thanks. Your projects are always so lovely.
April 2, 2014 | Unregistered CommenterKaren K
Silly me, I thought you were going to tell how to print the labels! The tutorial is great and I love the layering and scalloped edges. So now I have 10 yards of twill tape to use somehow.....
April 2, 2014 | Unregistered CommenterJill
Thank you for sharing! I've been looking (for many weeks) for these kinds of cotton tapes, but no one carries them that I know of. Now, at least I know I need to order on-line. I'll have to look for the other supplies you mentioned too - hopefully, I can find it. Your work is soooo gorgeous and love to see what you are making every week. Thank you so much for your tutorials!
April 2, 2014 | Unregistered CommenterSusan
Cute! By the way, your pictures haven't been showing up in Feedly lately (at least in mine). It's not really a problem to click over, but thought you might want to know!
April 2, 2014 | Unregistered CommenterCarrie
Fantastic! Thanks for the tutorial and all the information and inspiration!
April 2, 2014 | Unregistered CommenterDebbie R
Thank you for this, K! Those labels really do add just the right touch. :)
I loved your post. I saw the labels earlier on the pencil-type fabric cases, so I immediately bought some felt. I loved the labels with the felt behind them and also those with the fabric behind them. I thought I would use this idea with my regular labels. Thank you so much for your ideas!
April 2, 2014 | Unregistered CommenterDawn Jones
Thanks for the tutorial and the helpful links ; )
April 2, 2014 | Unregistered CommenterJanet W
Another wonderful blog post. Thank you so much. This was new and informative right down to where to find the materials and several alternative ways to use them. I plan to get some tapes and scissors and have some fun!!
April 2, 2014 | Unregistered CommenterKathleen
love 'em so much i had to go buy scallop scissors on ebay for myself! ;p
April 3, 2014 | Unregistered Commenterina
I love the tape idea. I have always ordered individual tags for my projects.
April 3, 2014 | Unregistered CommenterKim
Thank you so much for this! And the links to find the supplies! You always are so generous to share! :O)
April 3, 2014 | Unregistered CommenterBari Jo
Thanks for the darling label tutorial. I did just go buy 11 yards of labels per your suggestion! Can't wait to get them.
April 3, 2014 | Unregistered CommenterSheri
Thank you for inspiring me to dig out some of my scrapbooking twill, print on it and add it to a project. http://jersey-scrapper.blogspot.com/2014/04/printing-on-twill-tutorial.html
April 4, 2014 | Unregistered CommenterSue B
So simple and soo much fun! Thanks for the tutorial, but thanks also for including it on your sidebar with your other wonderful guides. They all really help when inspiration hits and my memory doesn't ;)
April 4, 2014 | Unregistered CommenterHeather (mtl)
Thank you, thank you, thank you! I just received my first set of labels on Friday. I found the links to shops on Darling Amy's blog! I am so excited to use them, I just need some Kraft-Tex! You are the best!
April 6, 2014 | Unregistered Commenterjenni
I love the long, skinny pouches that you have in the photos above. They're so cute! Do you have a tutorial or pattern for them? I would love to make one of them. I think they're the perfect size for holding all of my crochet hooks or makeup brushes when I'm traveling.
May 13, 2015 | Unregistered CommenterVeronica
Hi, I realize I'm late to the lovely label party but yours are so pretty I'm excited to make some for my handmade gifts. Checked on eBay for the scalloped scissors and find they come in different size scallops: 3, 5 & 7 mm. It looks you used either a 5 or 7 mm size for yours. Could you let me know? Thanks!
April 18, 2016 | Unregistered CommenterLinda U
so cute! I love these!!!!
December 19, 2016 | Unregistered Commenterbella

PostPost a New Comment

Enter your information below to add a new comment.
Author Email (optional):
Author URL (optional):
Post:
 
All HTML will be escaped. Hyperlinks will be created for URLs automatically.